Progress Bar

Skip to main content

Jaycar
...

Ultrasonic Parking Assistant

Ultrasonic Parking Assistant

Difficulty
Sight & Sound

Summary

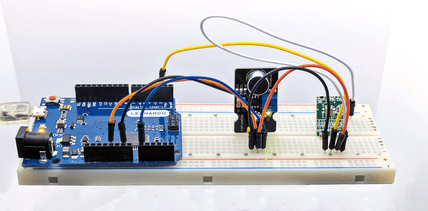
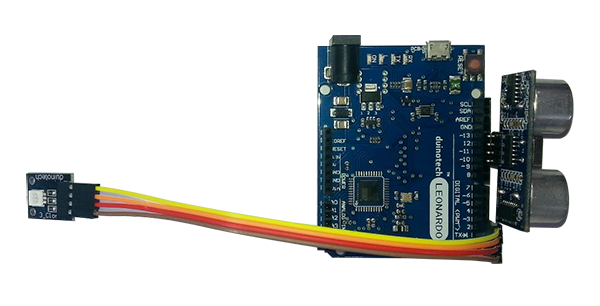
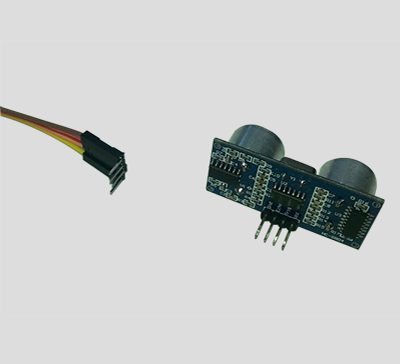
We saw a version of this project in The Shed Magazine, and thought it would be perfect to build using our duinotech parts. It simply uses an ultrasonic distance sensor to measure how far away the car is from the sensor, and then light up an RGB LED module to let you know how close you are. A simple job perfectly suited to an Arduino.

Materials Required

1Duinotech UNO r3 Main BoardXC4410
1Duinotech Leonardo r3 Main BoardXC4430
1Arduino Compatible RGB LED ModuleXC4428
1Eclipse 9V Alkaline BatterySB2423
1150mm Plug to Socket Jumper Leads - 40 PiecesWC6028

Table of Contents

This project is designed with simplicity in mind- the modules simply plug straight into the headers on the main board. The jumpers are used to extend the LED module to a point where you can see it. Our version of the wiring is as follows:

Main Board

Ultrasonic

RGB LED

Function

D0

B

Blue LED

D1

R

Red LED

D2

G

Green LED

D3

+

LED common

D10

VCC

Power

D11

TRIG

Trigger signal from Arduino

D12

ECHO

Echo signal from ultrasonic

D13

GND

Ground connection

If you have the version of the RGB LED with the BRG- markings instead of BRG+, connect – to D3 instead, and then you'll have to make a small change to the code before the sketch is uploaded. All the pins can be set in the sketch, so if these pins don't suit, they can be changed. If you're not sure, just go with what's listed above, as it's the default in the sketch.

The ultrasonic sensor simply pushes straight into pins 10-13. If you like, the pins can be gently bent back and straightened if you'd like to mount the main board against the wall. The RGB LED module is connected to the board via a set of jumper leads so that it can be mounted somewhere visible away from the board and sensor.

The sketch simply measures the distance that the ultrasonic sensor sees, then converts that into a colour:

Less than 30cm

Red

30cm to 60cm

Amber

60cm to 2m

Green

Above 2m

Blue

Like most of the parameters in the sketch, these thresholds can be changed in the #define statements at the start. Each time the LED is updated, it waits 200 milliseconds before the next update, just to prevent rapid flickering if the distance measured is near where it would change colour.

The only thing you might need to change is if you have the BRG- version of the LED module. Find the lines:

//#define LEDMINUS 3
#define LEDPLUS 3

And change them to read:

#define LEDMINUS 3
//#define LEDPLUS 3

There are no libraries to install, so open the sketch, plug in your board, and select the correct board type and serial port, then press upload. If you are using an Uno, you might need to temporarily disconnect the RGB LED while uploading to prevent it interfering with the serial communications.

The LED should light up immediately after programming is finished- it’s designed so that it’s always showing something, so you know it’s working. It should respond to something as small as a hand in front of it, so trying moving a hand back and forth in front of the ultrasonic sensor. If the LED doesn’t light up or is the wrong colour, check the LED wiring matches the LED pin definitions in the sketch. If the LED is flickering erratically or not changing as you move your hand, there might be a problem with the ultrasonic sensor wiring.

//Ultrasonic Parking Assistant
//measures distance using ultrasonic sensor
//displays approximate closeness with colours on LED module
//Blue- out of range (3m typically)
//Green- in range, but far away
//Amber- closer
//Red- very close
#define GREENDISTANCE 200
#define AMBERDISTANCE 60
#define REDDISTANCE 30

// Ultrasonic HC-SR04 unit interface
//define pins here
//if using fixed power pins, set to a negative number, and they will be ignored
#define UVCC 10
#define UTRIG 11
#define UECHO 12
#define UGND 13

//define led module pins here, polarity is automatically handled by presence of LEDPLUS or LEDMINUS
//if LED's have common negative, use LEDMINUS
//if LED's have common positive, use LEDPLUS
//#define LEDMINUS 3
#define LEDPLUS 3
#define LEDBLUE 0
#define LEDRED 1
#define LEDGREEN 2

void setup(){
  usonicsetup();  
  ledsetup();
}

void loop(){
  byte r=0;             //for red led
  byte g=0;             //for green led
  byte b=0;             //for blue led
  long d;               //for distance
  d=usonic(17400)/58;   //convert ping time to distance in cm
  if(d==0){d=300;}      //sometimes returns 0 when not in range
  if(d=REDDISTANCE)&&(d<300)){g=1;}   //turn on green LED if amber or green needs to be shown
  if(d>=300){b=1;}            //turn on blue otherwise, so you know it's working
  ledset(r,g,b);              //set the LED's
  delay(200);                 //wait a bit so it won't flicker too much
}

void ledsetup(){      //set up led pins depending on whether they are common + or common -, turn all LED's off
#ifdef LEDPLUS
  pinMode(LEDPLUS, OUTPUT);
  digitalWrite(LEDPLUS, HIGH);    
  pinMode(LEDRED, OUTPUT);
  digitalWrite(LEDRED, HIGH);    
  pinMode(LEDGREEN, OUTPUT);
  digitalWrite(LEDGREEN, HIGH);    
  pinMode(LEDBLUE, OUTPUT);
  digitalWrite(LEDBLUE, HIGH);    
#endif
#ifdef LEDMINUS
  pinMode(LEDMINUS, OUTPUT);
  digitalWrite(LEDMINUS, LOW);    
  pinMode(LEDRED, OUTPUT);
  digitalWrite(LEDRED, LOW);    
  pinMode(LEDGREEN, OUTPUT);
  digitalWrite(LEDGREEN, LOW);    
  pinMode(LEDBLUE, OUTPUT);
  digitalWrite(LEDBLUE, LOW);    
#endif
}

void ledset(byte r, byte g, byte b){
#ifdef LEDPLUS
  r=!r;         //invert if we're using common +
  g=!g;
  b=!b;
#endif  
  digitalWrite(LEDRED, r);    //set outputs
  digitalWrite(LEDGREEN, g);    
  digitalWrite(LEDBLUE, b);    
}

void usonicsetup(void){
  if(UGND>-1){                  //set up ground pin if defined
    pinMode(UGND, OUTPUT);
    digitalWrite(UGND, LOW);    
  }
  if(UVCC>-1){                  //set up VCC pin if defined
    pinMode(UVCC, OUTPUT);
    digitalWrite(UVCC, HIGH);    
  }
  pinMode(UECHO, INPUT);        //ECHO pin is input
  pinMode(UTRIG, OUTPUT);       //TRIG pin is output
  digitalWrite(UTRIG, LOW);     
}

long usonic(long utimeout){    //utimeout is maximum time to wait for return in us
  long b;
  if(digitalRead(UECHO)==HIGH){return 0;}    //if UECHO line is still low from last result, return 0;
  digitalWrite(UTRIG, HIGH);  //send trigger pulse
  delay(1);
  digitalWrite(UTRIG, LOW);
  long utimer=micros();
  while((digitalRead(UECHO)==LOW)&&((micros()-utimer)<1000)){}  //wait for pin state to change- return starts after 460us typically
  utimer=micros();
  while((digitalRead(UECHO)==HIGH)&&((micros()-utimer)

Future Improvements

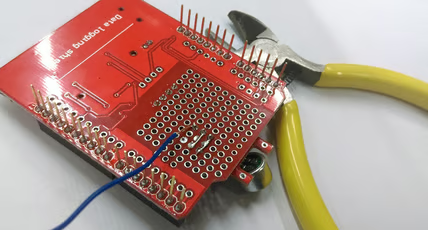
To make full use of the Ultrasonic Parking Assistant, it should be mounted on something fixed and pointing towards where the car will be approaching (ideally, right towards the number plate). We found that it could be made flat by gently bending the pins on the ultrasonic sensor and jumper leads 90 degrees, like below:

Ultrasonic-Parking-Assistant-3.png
Ultrasonic-Parking-Assistant-4.png

Be careful bending the pins, as they can snap off if bent too far. After this, it could simply be attached to a wall using double-sided tape, being careful to ensure the bare pins don’t short out on anything metal. The next step is to power it. You could use a 12V Plug Pack, or look at other power ideas for Arduino projects in our Powering Your Arduino guide.

None of the duinotech parts are waterproof, so we recommend that it not be installed outdoors.

Apart from these ideas, you could add a Buzzer Module to give an audible warning as well as visual- this would need to added to the code though. If the LED isn't visible, multiple jumper leads can be connected end to end to extend it further, and the LED can of course be attached to a wall with some of the double sided tape.

Similar projects you may be interested in

Wireless Garden Monitor
Sight & Sound
Digital Photo Frame
Difficulty

Arduino Clap Light
Sight & Sound
Arduino Clap Light
Difficulty

WiFi LED Lightstrip
Sight & Sound
WiFi Controlled Strip Lighting
Difficulty

Sight & Sound
Arduino Power Saving and Battery Night Light
Difficulty