Progress Bar

Skip to main content

Jaycar
...

LED Musical Christmas Tree

LED Musical Christmas Tree

Difficulty
FESTIVE

Summary

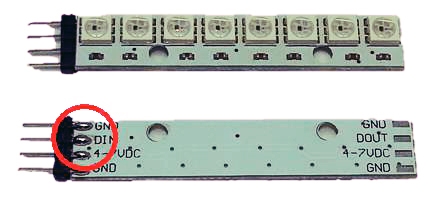
One of the ideas that sprung to mind when we first got in the XC4380 LED Strip Module was that it would be great for displays like Christmas lights. With Christmas on the way, we've turned them into a miniature Christmas tree complete with music playing from an SD card. Add a little bit of Christmas to your desk or workbench! Some soldering needed.

Materials Required

1Duinotech UNO r3 Main BoardXC4410
3Duinotech Arduino Compatible WS2812B RGB LED StripXC4380
14.2kHz Audio TransducerAB3440
18GB Class 10 microSDHC CardXC4983

Shield

LED Strip 1

LED Strip 2

LED Strip 3

Piezo Buzzer

5V

VDC

VDC

VDC


GND

GND

GND

GND

BLACK

D6

DIN


DOUT

DIN


DOUT

DIN


D9


RED

Start by soldering the short piece of header strip to the input end of each LED strip. This is the end that has the 'DIN' marking.

Solder the three modules onto the Datalogging Shield in a tree shape, but make sure the ends aren't pushed tight together as we have to make some connections at the top. We found it easiest to solder one pin and make sure all three strips were where we wanted them before soldering everything in place rigidly.

The position isn't critical, but if you follow what we've done you'll be able to work out the wiring more easily. On the underside of the Datalogging Shield run red and black wires for 5V (marked 4-7VDC on the strips) and GND connections.

Run a wire from D6 to the DIN pin on the strip closest to it and also run some wire from the DOUT on one strip to the DIN on the next strip - all the DINs should be connected to something. There's no reason you can't drape the wire around the strips a bit to make it look more like tinsel on the tree.

Finally take the Piezo Transducer and solder the black wire to GND and the red wire to D9.

Download the source code, extract into a new folder, open the .ino file in the Arduino IDE and press upload.

You can add more strips by connecting DIN to DOUT of the last strip and change this line of code:

#define LEDCOUNT 24

The color definitions can be changed at the start of the sketch:

unsigned long colours[6]={ //only using half intensity so we don't overload USB power
pixels.Color(127,0,0), //red
pixels.Color(0,127,0), //green
pixels.Color(0,0,127), //blue
pixels.Color(127,127,0), //yellow
pixels.Color(127,0,127), //purple
pixels.Color(127,63,0) //orange
};

There won't be any music or sound as the card will be empty. You will need to copy .wav format files (.mp3's will not work as the Arduino does not have enough processing power to decode the .mp3) in 8bit mono format, preferably at not more than 32 kHz sample rate. We found the free to download Audacity program was easy to use for this.

The Arduino will simply cycle through all the files in the root folder of the SD card so make sure there aren't any other files there as the Arduino might try to play them.

Similar projects you may be interested in

FESTIVE
Christmas Countdown Clock
Difficulty