Battery Powered Fridges
Summary
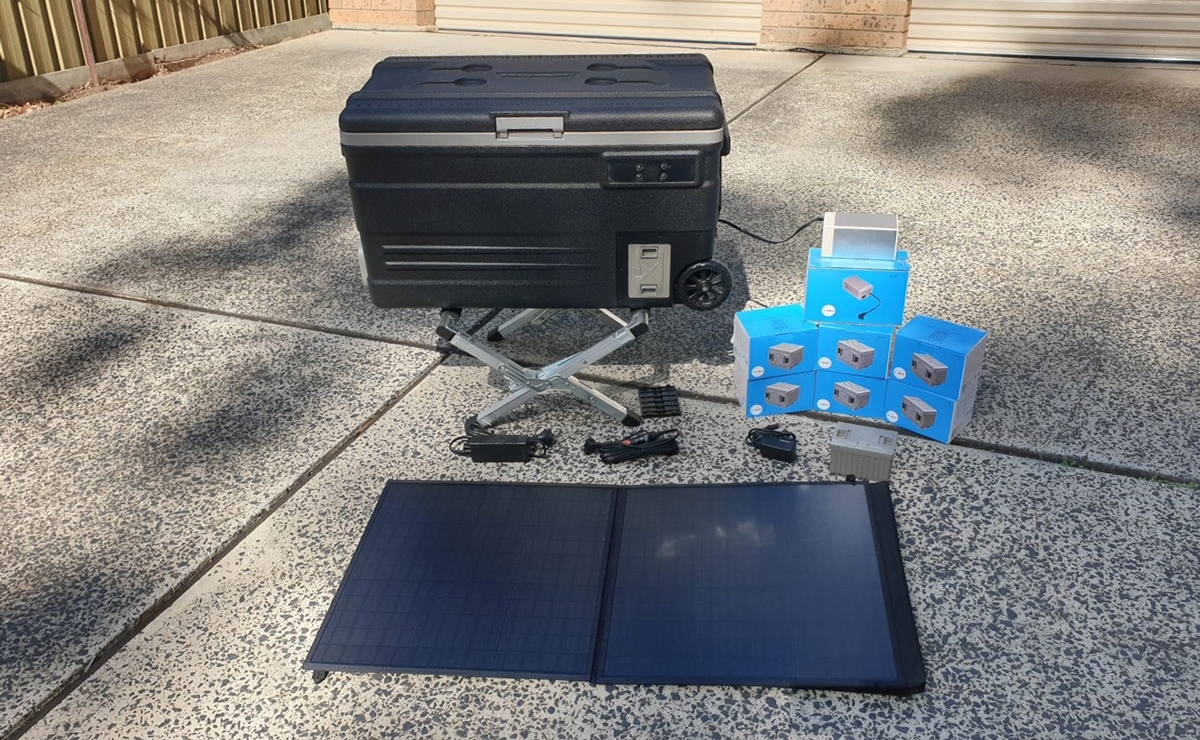
We take a look at camping fridge freezers that can be run on their own batteries, as well as the usual mains and 12V options, and cover how to choose a battery, how to charge it from both mains and car power, and even a solar panel!
Materials Required
| 1 | 5.2Ah Removable Lithium Battery (Version 3) to Suit Brass Monkey Fridge/Freezers with Battery Support | GH2049 |
| 1 | 7.8Ah Removable Lithium Battery (Version 3) to Suit Brass Monkey Fridge/Freezers with Battery Support | GH2051 |
| 1 | 15.6Ah Removable Lithium Battery (Version 3) to Suit Brass Monkey Fridge/Freezers with Battery Support | GH2053 |
| 1 | 15.6Ah External Fridge Battery with Internal Charge Controller | GH2084 |
| 1 | 12.6V Charger for Version 3 Brass Monkey Lithium Batteries | GH2059 |
| 1 | 100W Canvas Blanket Solar Panel suitable for Brass Monkey Battery/Solar ready Fridge/Freezers | GH2015 |
| 1 | Folding Aluminium Fridge Stand - 150kg Rated | GH1608 |
Table of Contents
- Benefits of a Portable Fridge/Freezer
- What Does Ah, Amp Hours, and Battery Capacity Really Mean?
- Why we Use Lithium Based Fridge Batteries
- How to Choose the Right Fridge Battery
- How to Maximise Fridge Battery Power
- Around the Battery
- Installing the Battery
- Remember to Turn Your Battery on
- How to Charge the Battery From Mains Power in the Fridge
- How to Charge the Fridge Battery on its Own Using Mains Power
- How to Charge the Fridge Battery From Car Power
- How to Use the Solar Panel to Charge the Fridge Battery
- How to Turn a Regular Fridge Into Battery Powered Fridge
- Using a Power Tool Battery to Power Your GH2028 Fridge
- Using a Fridge Stand
- Improve Fridge Performance With a Cover
Benefits of a Portable Fridge/Freezer
Portable fridges are becoming a must-have, and not just for camping. While they are great for going off-grid, they are also useful for keeping groceries cold on the way home. Maybe you live a decent drive away from the shops, which is a major concern in rural and remote areas. Maybe you just want to do more errands or shopping on the way home. Besides that, car fridges are great for picnics, keeping a crisp white wine chilled, or keeping drinks cold on the job site, weekend sport, or a road trip.
Traditionally, fridges were bulky and very power-hungry. Only twenty years ago, you could not even leave a car fridge connected over lunch, else it would drain the battery too much to start the car! They have progressed in leaps and bounds since then. Now, they are smaller (for a given capacity), more reliable, and far more energy efficient. They have become so efficient, that some can even run not on car batteries, but their own batteries!
We are going to look at the available batteries, how to choose the right one for you, and how to install them. Then, we will look at how to charge them and operate the fridge, from both mains and car power. You can get dedicated solar panels for these fridges, too. There are some other accessories available to help make the fridge more usable or more efficient, like a stand or covers. Right at the end, we will show you a couple of options to make any Brass Monkey fridge a battery powered fridge.
Throughout this post, we are using the GH2078 74L single-zone fridge, and an older model dual-zone dual battery fridge. However, everything we discuss applies to other battery supported fridges in the range, too.
Currently, these are:
Catalogue Number | Capacity (L) | Zones | Battery Capable | Solar Capable | Cover Available* |
GH2068 | 15 | Single | Yes | Yes | GH2031 |
GH2047 | 18 | Single | Yes | Yes | - |
GH1624 | 22 | Single | No | No | GH1625 |
GH2006 | 25 | Single | No | No | GH2007 |
GH2028 | 25 | Single | Yes x 2 | Yes | GH2029 |
GH1640 | 36 | Dual | No | No | GH1650 |
GH2030 | 42 | Single | Yes | Yes | GH2001 |
GH1642 | 50 | Dual | No | No | GH1652 |
GH2077 | 55 | Single | Yes | Yes | - |
GH1644 | 60 | Dual | No | No | GH1654 |
GH2070 | 74 | Single | No | No | GH1681 |
GH2078 | 74 | Single | Yes | Yes | - |
GH1646 | 80 | Dual | No | No | GH1656 |
GH2082 | 95 | Dual | Yes | Yes | GH1683 |
GH2038 | 95 | Dual | Yes | Yes | GH2013 |
GH1648 | 100 | Dual | No | No | GH1658 |
If you aren't up for the electrical theory, just skip to the ‘How to choose a fridge battery’ section below and follow the steps without knowing why. Unless you're a curious type or have heard differently, then it won't change anything for you anyway!
To understand battery capacity, we need a very brief lesson on electrical theory. The voltage of an electrical current, measured in volts (V) is very similar to the pressure of water in a pipe, measured in a unit of pressure like Pascals (Pa), Bar, or Pounds per Square Inch (PSI). The amount of electricity flowing is the current, measured in Amperes, shortened to Amps (A). This is like the amount of water in a pipe, measured in litres per minute.
All electronic devices have an operating voltage. Car electrics, for example, work from between around 11V to 15V. The car battery is at 14.4V while the car engine is running, 13.8V when the battery is charged and the engine is off, and lower as the battery drains. Because they are designed for this, the operating voltage is wide. USB devices, however, have an operating voltage of 5V. Many will cut out and stop working when that voltage falls below 4.8V or 4.7V. Fridges are no different: They have an operating voltage like anything else.
Batteries have a capacity that measures how much energy they store, and give the figure in amp-hours, written as Ah. However, this is not a figure you can use as-is. Despite a lot of assumptions online, even among experts, that suggest otherwise, you cannot use 5A for one hour from a 5Ah battery! The problem is that the amp-hour system is an industry standard to compare different batteries, even batteries with different chemical make-ups.
Different battery chemistries perform in different ways. Lithium batteries keep a stable voltage for a large part of their capacity, then the output voltage drops near the end. Alkaline batteries like the common AA have a shallow fall in their voltage until toward the end, then the voltage falls faster. The output voltage of basic lead-acid batteries (deep-cycle types perform a bit better) falls almost immediately and falls below a usable amount when there is lots of actual capacity left.
For this reason, the amp-hour standard is actually calculated based over a discharge of twenty hours, and until the battery reaches 0V! You may have spotted the problem here: the battery is useless for most tasks well before it reaches 0V. It is useless once the output falls below the device's minimum operating voltage. That seems silly on the face of it, but industrially and scientifically, it is the only fair way of comparing batteries. The other challenge is that the faster you draw current from a battery, the more internal physical and chemical factors reduce the amount of capacity that is usable.
The upshot of all this is that a 5Ah 12V battery could not supply 12V at 5A for one hour. It cannot even supply 12V at 0.4A for 20 hours, because the rate is to 0V!
The above information may make it seem like you need a 100Ah battery to run your fridge all night, but that is not true. Lithium batteries come in two main varieties; Lithium-Cobalt and Lithium Ferro-Phosphate or Lithium Iron-Phosphate (not to be confused with Lithium-Ion, which is a general term). Lithium-Cobalt batteries are the common type found in mobile devices, laptops, scooters, and the batteries we use to run portable fridges. They have a high energy density (the amount of energy a physical amount of material can hold) and can maintain a stable or reasonably stable output voltage to around 90% of their stated capacity. That compares really well to a lead-acid car battery, which can only discharge around 20% of their capacity before the voltage falls too low, and lead-acid deep cycle batteries which are typically 50%.
Lithium Ferro-Phosphate batteries have a lower cell voltage than Lithium Cobalt (3.2V vs 3.7V) and a lower energy density, but cannot catch fire like Lithium-Cobalt can. This is why it is the preferred chemistry for in-car second batteries that can be damaged in a vehicle accident or have very high demands placed on them. These are not factors that affect your fridge battery!
In addition to that, the batteries we are talking about have a Battery Management System in them. This is a circuit that looks after the battery. It charges the cells that make up the battery properly, by monitoring them individually; it prevents overcharging, too much current being drawn at once (short-circuit protection) and the battery being drained too far (over-discharge protection).
That all means that, for practical purposes, you can assume that you can use around 90% of the stated capacity of a dedicated fridge battery.
All of the Brass Monkey fridges use the same operating voltage, and the same physical battery case size. The only difference is the amount of cells fitted into each, which dictates the capacity. To decide on a battery size to buy for your fridge, first think about how long you are going to need the fridge to run without other power. Write this number down.
Then, consider the conditions. The fridge compressor, which is the main thing that draws power (the temperature sensor circuit, displays, and electronics draw almost negligible amounts), runs when the fridge needs to cool down. So, if it gets opened often, more heat gets in and the compressor needs to cool the fridge more. If it is sitting in the sun, the compressor needs to work more. If the fridge is empty, more warm air gets in (versus a full fridge in which there is less air exchange) when it is opened.
In the shade, opened rarely, and on a cool day, the compressor can run for as little as 20% of the time. If you don't open it at all, it may be even lower!
Opened often, in the sun, on a hot day, compressor time can increase up to 70% for the hot summer days!
For more mild weather, with the fridge in the sun and with reasonably frequent opening, assume 50%.
If you really want to be sure, keep an eye on the fridge when it is powered from a car battery or mains power, in similar conditions, and observe.
Once you have a figure for compressor run time, write it down.
The last thing you need is the operating current of the fridge. Remember, the voltage is consistent across the range anyway. The current is written on the compliance label, the panel that has the electrical standards approvals, model number, and other specifications.
Put those numbers into this formula:
restimated it, too! The decision may well be a financial one, as the batteries vary in price considerably with their capacity.
((H x A x Rt) ÷ 9) × 10 = Battery CapacityWhere:
H is the number of hours the fridge needs to run (remember to convert to a decimal of 10, so 30 minutes is 0.5, not 0.3)
A is the current draw in Amps
Rt is the run time of the compressor. Convert the percentage to a decimal, so 70% is 0.7, 50% is 0.5, 20% is 0.2).
The next two steps come from the fact that the battery can only be discharged to around 90% of its stated capacity before the voltage falls too low to be usable. By dividing by 9, we find out what the 90% amount is. By multiplying by 10, we find out what the total is that we can take 90% of!
Here is an example: We have a fridge that draws 5A when running. We want it to run on its own for four hours to the shops, some errands, then home. It is a spring day, around 25°C. The car air conditioning will cool the car when we are in it but when the car is in the sun, the temperature will climb. However, we are only opening it to put things in, so we chose a figure of 40% run time.
((5 x 4 x 0.4) ÷ 9) × 10 = 8.9AhBy the way, the extra set of brackets is mathematically unnecessary because of Order of Operations Rules. However, we have found through experience that many people forget them. The rules say that brackets are done first, from the inside set, outwards, then multiplication and division from left to right.
That means we can do the H x A x Rt bit, then divide it by nine, then multiply it by ten. However, with a single set of brackets, people often forget about order of operations and do the brackets as one unit, then 9 x 10 because they find it easier, then divide the brackets by that! It will give you a wildly wrong answer.
We have assumed a lot about the run time but we think that's the worst-case for our situation. Now, we need to choose a battery size. Note that this maths assumes a fully charged battery to get those run times.
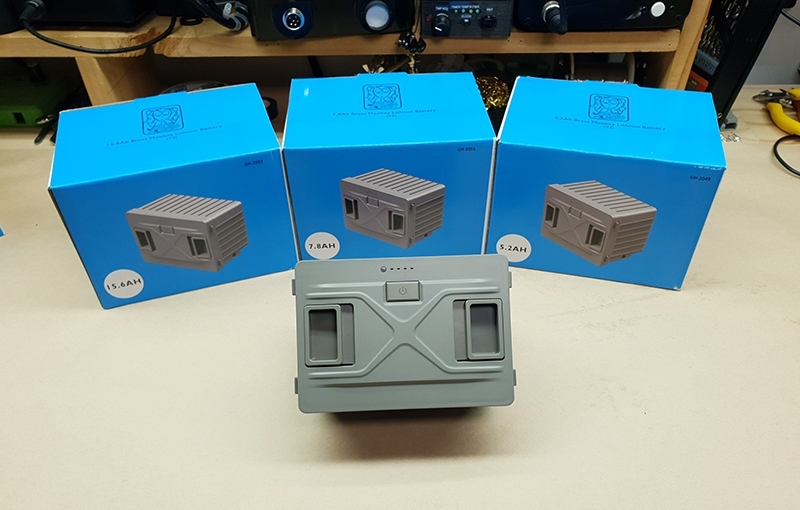
The general rule is to go up to the next standard size. Standard sizes are 5.2Ah, 7.8Ah, and 15.6Ah. Therefore, we need a 15.6Ah battery.
However, we could use a 7.8Ah battery and hope for at least 3.5 hrs, or that the car does not get as hot. We did assume a bit about how hard the compressor works. We could have underestimated it, too! The decision may well be a financial one, as the batteries vary in price considerably with their capacity.
The best way to maximise battery life, aside from the normal stuff like keeping the fridge shaded, only opening it when necessary, and so on, is to pre-cool it with another power source like mains or the car battery. Then, the battery is maintaining a temperature, not driving the compressor while it cools the fridge down the first time. Doing this will also allow the battery to charge first, before being disconnected, if you have not separately charged it. Bear in mind it may take longer to charge the battery than to cool the fridge.
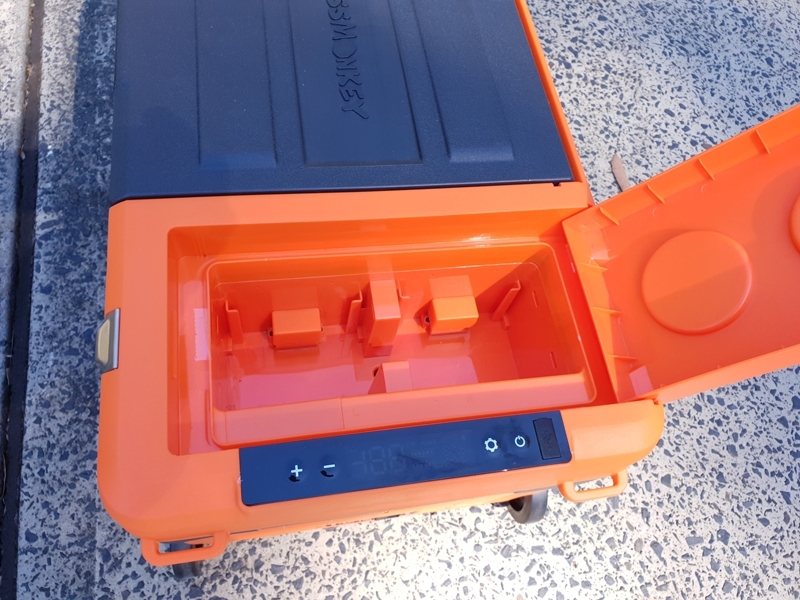
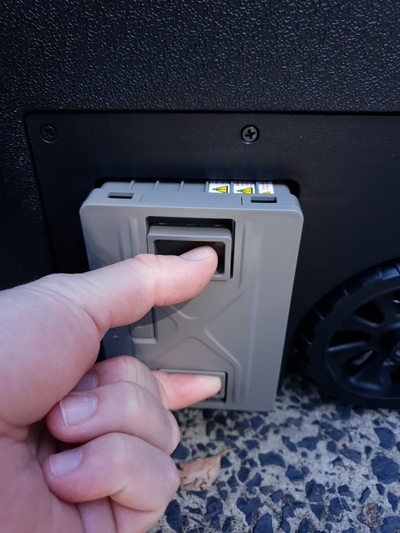
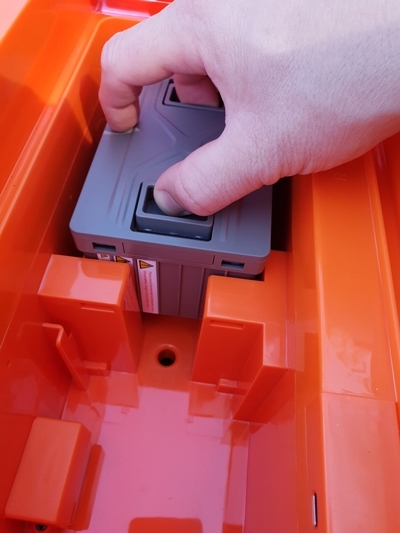
On the top of the battery is a round LED, four small rectangular slots, and a power button. The round LED is the power indicator, and tells you whether the battery is on or off. That is really important later when using the fridge. The four small rectangular slots are power level indicator LEDs. When the battery is running, they show how much capacity is left. When it is charging, they flash to show charge level. For a stored or unconnected battery, press the power button quickly and the four LEDs light for a couple of seconds to show you how charged the battery is or is not.
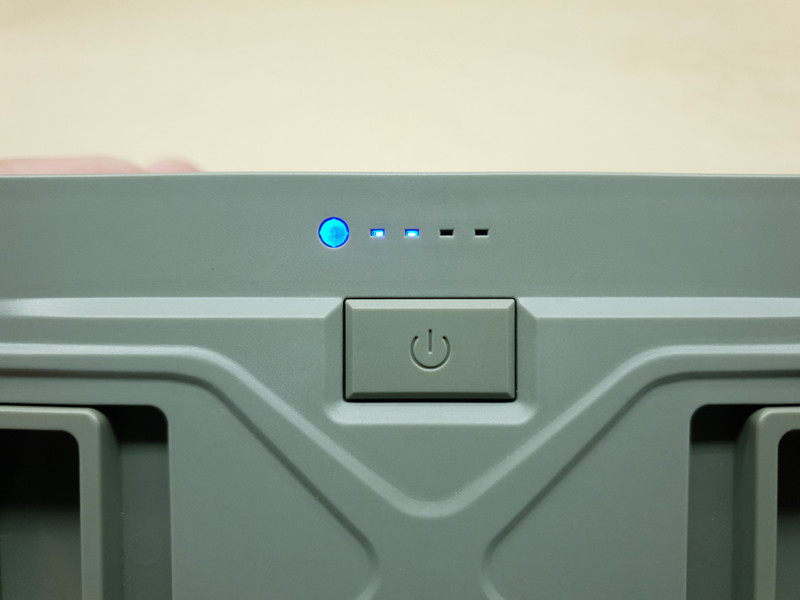
Also on the top of the battery are two rectangular finger slots. These pull in the retainer clips at the sides of the battery, and are very important when fitting it.


On one long side, the base of the battery has an undercut, two locating lugs, and a set of terminals. This is how power gets from the battery to the fridge. The black bit is the electrical contact housing, and is really the business end of things. The grey plastic lugs are just locating lugs for some models of the fridges.
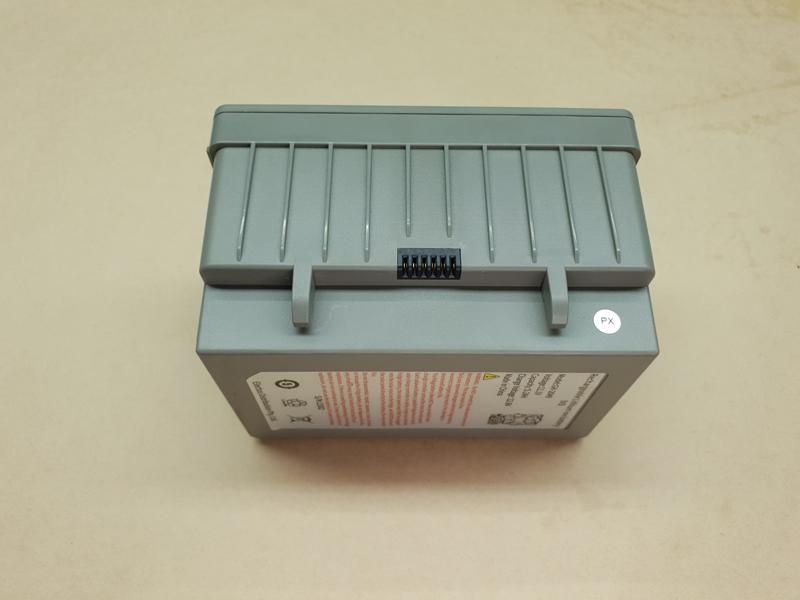
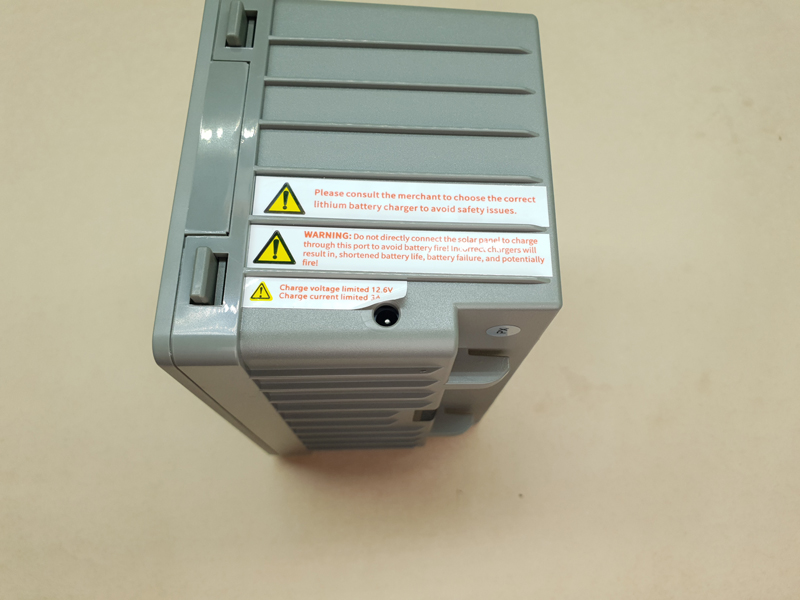
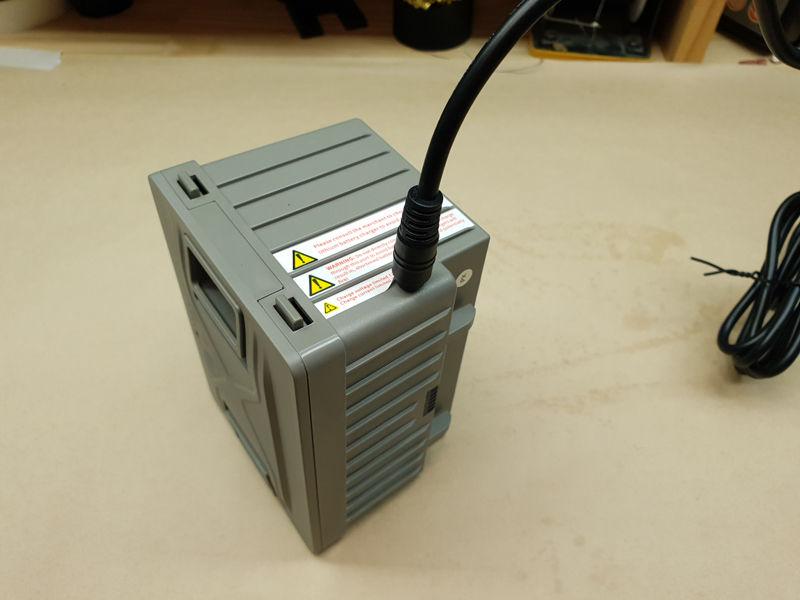
Finally, on one end only is a socket for mains charging. It may be covered partially or even fully by a safety label. Look closely if you cannot see it at first and feel all the labels, looking for a depression under them.
All of the batteries in the range are the same physical size. The different capacities are gained by placing more or less individual batteries into these cases. It makes handling and fitting much easier to design them this way.
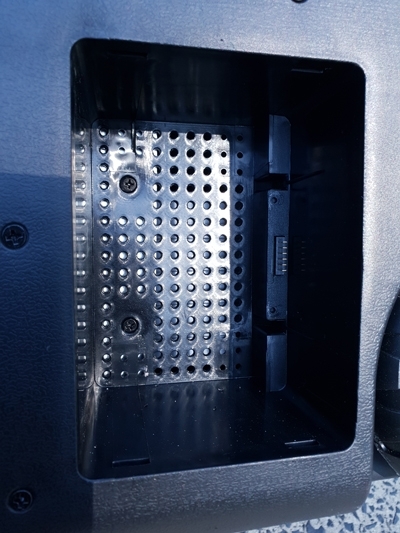
Before you install the battery, you need to find where it goes. Different fridges in the range have different placements for the battery.
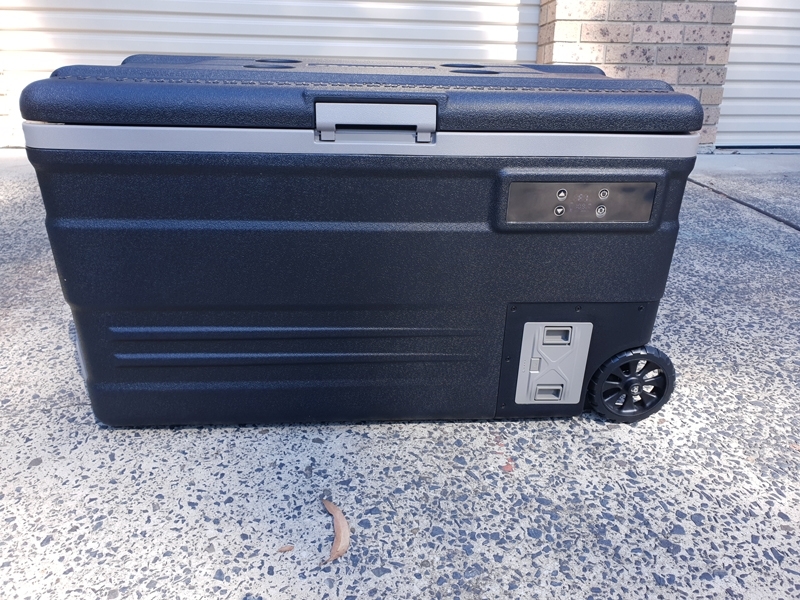
Some are in the top, some in the side, and some in one of the ends.
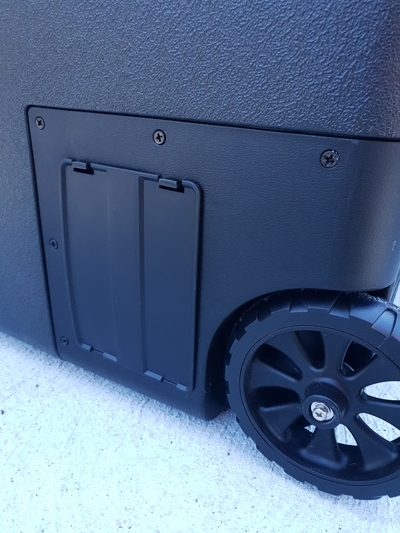
Dual battery fridges tend to have the battery compartment in the top of the fridge, but not always. Look for a panel which clips onto place and has some sort of catch or latch that can be operated with a finger.
The batteries for Brass Monkey fridges are a plug-and-play arrangement. Some of the fridges have locating guides and a set of terminals, and the battery goes into the space in the fridge only one way. Therefore, installing one is as easy as locating the battery cavity, taking off the cover, sliding the battery in, and replacing the cover if relevant.
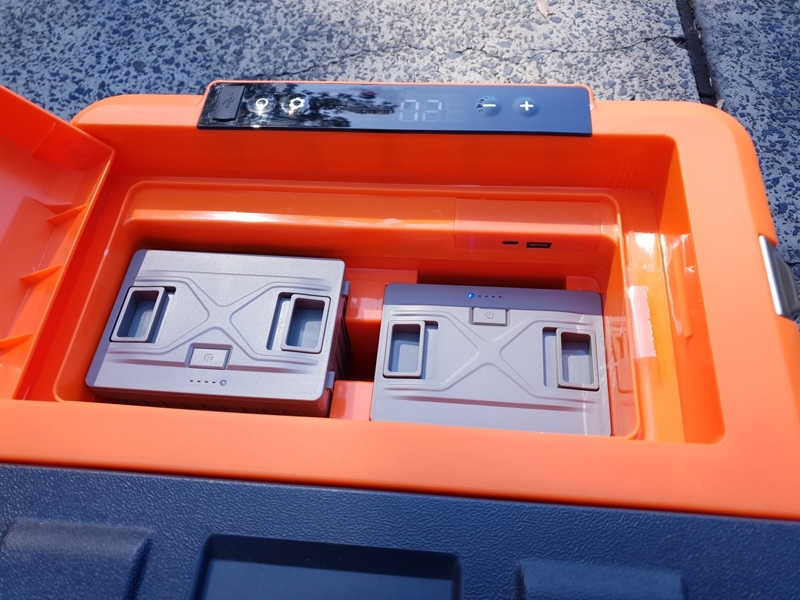
On other fridges, the battery could be inserted the wrong way around, but it will not make contact with the terminals. This older model of dual-battery fridge is an example. One battery is inserted the right way, while the other is wrong. You can see that the one that is wrong sits higher, as it does not slide onto the terminals.
In both cases, make sure you squeeze the locking tabs in, because they are not ramped or sloped on the underside. In other words, they will not press in by pushing on the battery. You must manually activate them.
Additionally, some fridges have covers on the battery terminals. This is usually on fridges where the terminals and cavity are vertical and could attract debris. Make sure you remove the slide-on cover first. This seems obvious but the plastic is usually the same colour as the cavity, or thin clear plastic, and so it may not always be obvious.
Once you have the battery cavity ready, turn the battery so the terminals on the base line up with the terminals in the cavity.
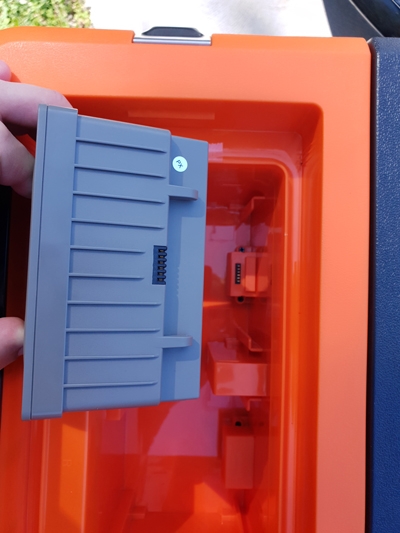
Slide the battery in and push until the retaining clips spring into place.
Before you can use your fridge, you MUST turn the battery on! The fridge will not work until the battery has an active output, which only comes from pressing the power button on the battery for three seconds.
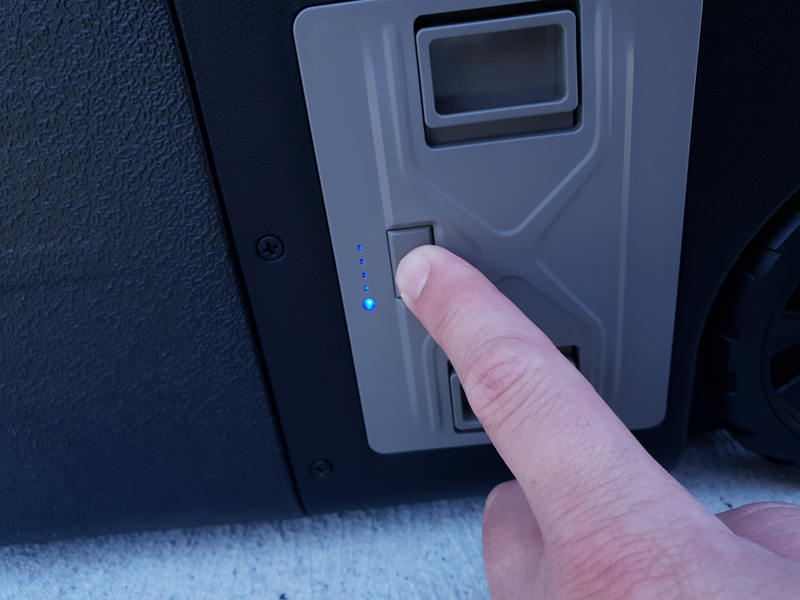
Most fridges turn on straight away with an active power supply, so you will see both the LEDs on the battery, and the LCD screen on the fridge, light up when the battery output is active.

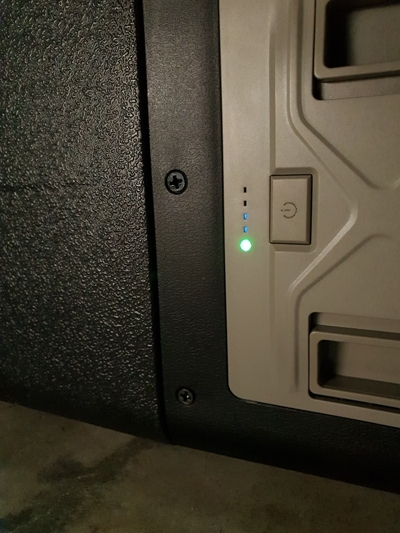
Charging the battery from mains power is as easy as plugging in the fridge the normal way, but with the battery installed. There is an internal charging circuit in the battery itself, within the Battery Management System (BMS), and it senses when power is available to charge the battery rather than give power to the compressor. When you plug in a fridge with a battery installed into mains power, you will see a display icon in the LCD for battery, and it will flash to show charging.
In addition, the lights on the battery itself light up to show the battery is charging. If you are unsure about the icon on the LCD, or if for some reason your fridge does not show it, take off the battery cavity cover and check the onboard LEDs.
Leave your fridge connected to mains power at least until the battery icon stops flashing, indicating a full battery charge. Many fridges have a 5A mains power supply but the compressor draws 5A when running. The battery will only charge when the compressor is not running. Therefore, all of the factors we described above that affect how long a fridge lasts on battery (which in turn are the things that affect how much time the compressor spends running) affect battery charge time.
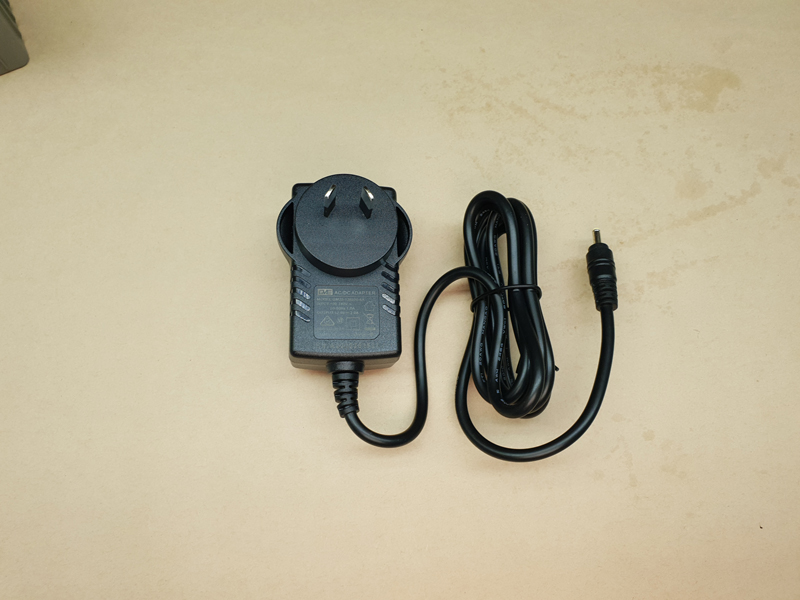
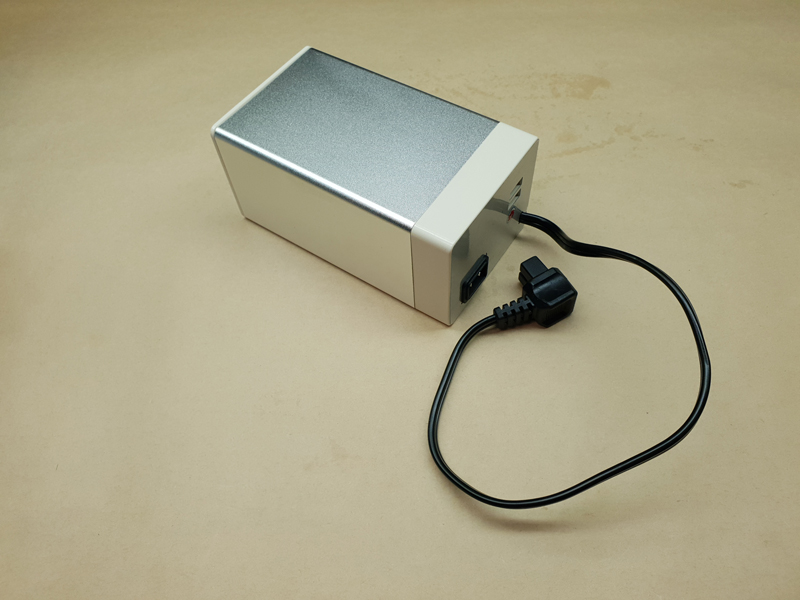
The batteries are capable of being charged outside of the fridge too, on their own. However, you will need a dedicated plugpack mains charger for this. Somewhere on the side of the battery is a small socket with a pin visible on the centre. This is the mains charging socket. The plug on the mains charger fits in here. Just plug in the plugpack to the wall outlet, plug the other end into the battery, and check that the LEDs on the battery show it is charging. The battery's internal Battery Management System takes care of the charging process, including cut-off when it is full.
If you have previously transported, stored, or used your batteries, check that the socket in them is free of debris before you plug the charger in.
This system enables you to charge multiple batteries. Lithium batteries have a great shelf life with minimal internal discharge so you can keep them usable for months at a time. That means you can charge a bunch up before you go away, or keep them ready in case the household mains power fails. Having a battery fridge and freezer in a blackout means you can put your most perishable stuff in your portable camping fridge if the power looks to be off for a long time, and not lose it to waste!
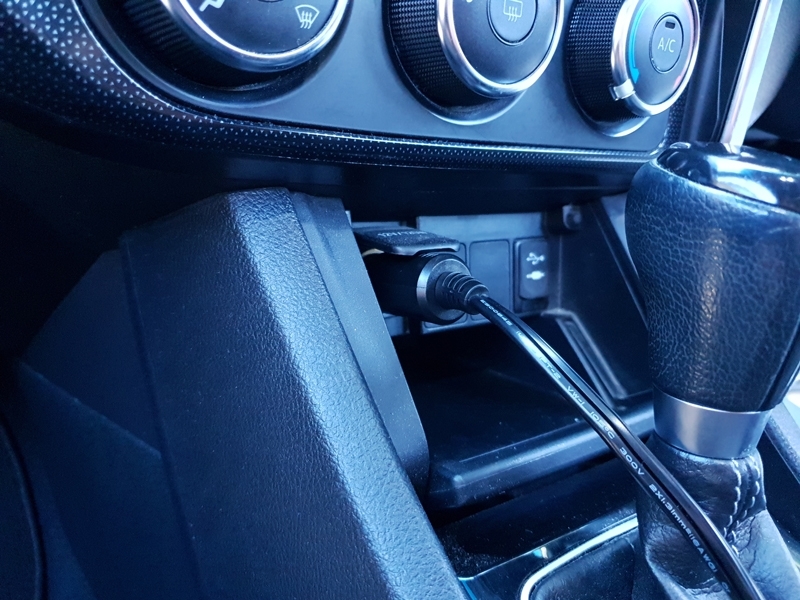
Charging the battery from car power is as easy as plugging in the fridge the normal way, but with the battery installed. There is an internal charging circuit in the battery itself, within the Battery Management System, and it senses when power is available to charge the battery rather than give power to the compressor. When you plug in a fridge with a battery installed into car power, you will see a display icon in the LCD for battery, and it will flash to show charging.
In addition, the lights on the battery itself light up to show the battery is charging. If you are unsure about the icon on the LCD, or if for some reason your fridge does not show it, take off the battery cavity cover and check the onboard LEDs.
However, in-car use carries some extra points to note. Battery charging will draw additional power from the supply so that the battery can charge while the compressor runs. The mains power supplies are not capable of this. If your fridge uses a high-current Anderson-style connector for power, then you will likely not even notice the difference. If you are using the cigarette-lighter plug, however, make sure the fuse is not rated at 5A! The cigarette lighter socket can supply 10A (15A in some vehicles but this is above the industry norm) and battery charging may draw up to that.
Having said that, some fridges have the current limited by internal circuitry. Your particular fridge may still only ever draw its rated current and charge the battery only when the compressor is off.
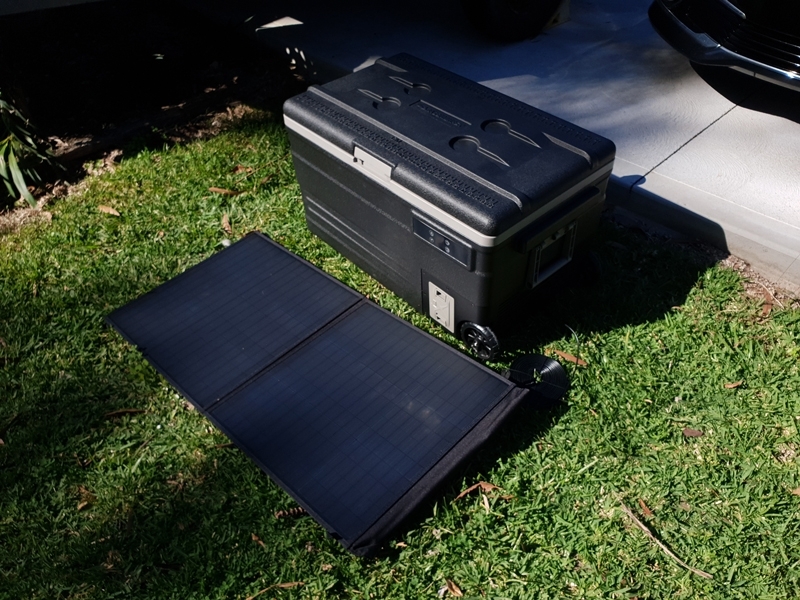
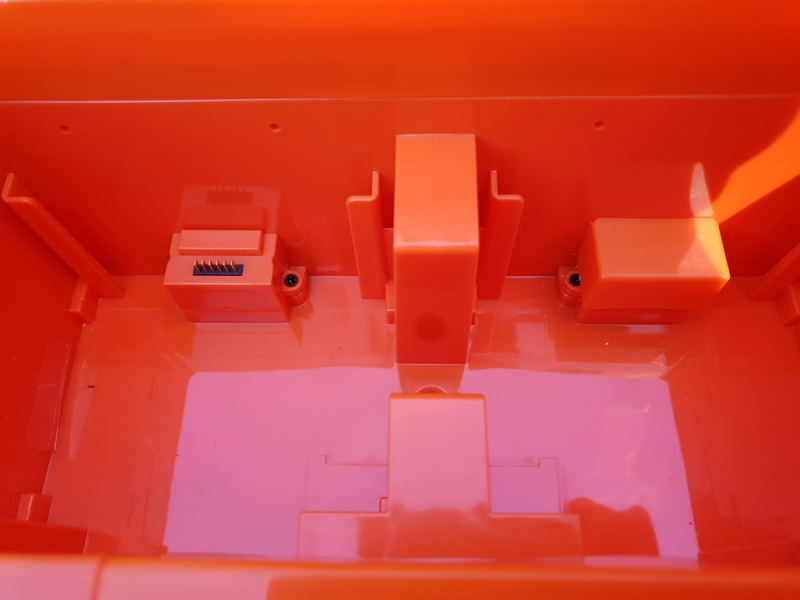
If you have stopped in one spot for a while, you can use a dedicated solar blanket charger (GH2015) to charge and run your fridge. The solar panel charges at 100W, in ideal sun and temperature conditions, so that is a capability of around 8A! The solar panel only works with the battery installed, because compressors draw a startup current that is momentarily much higher than the operating current. The power supplies can handle this but the solar panel does not. The voltage also varies with clouds, shadows of people walking, and so on, and therefore the battery and its charger are necessary to provide smooth, clean power to the fridge from a solar panel.
The dedicated solar blanket has a DC plug on the end of its power cable that matches a socket in the end panel of fridges that are designed to use it. Look for this on the end if your fridge is, or might be, solar capable.
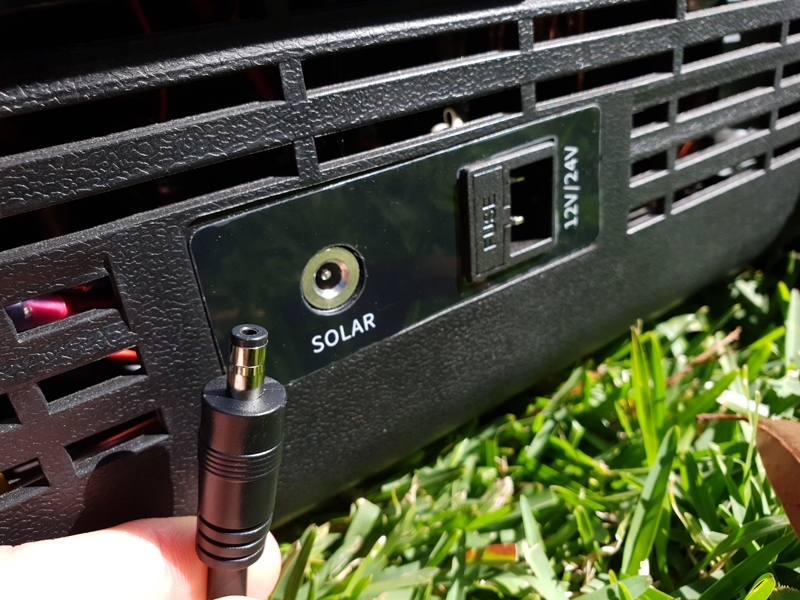
To charge your fridge battery and run the fridge from solar power, all you need to do is install the battery as described above, and plug in the solar panel. When exposed to good sunlight, there will be a battery charging icon in the fridge's LCD panel. To help you along, there is a built-in stand on the back of the panel.
In addition, the lights on the battery itself light up to show the battery is charging. If you are unsure about the icon on the LCD, or if for some reason your fridge does not show it, take off the battery cavity cover and check the onboard LEDs.
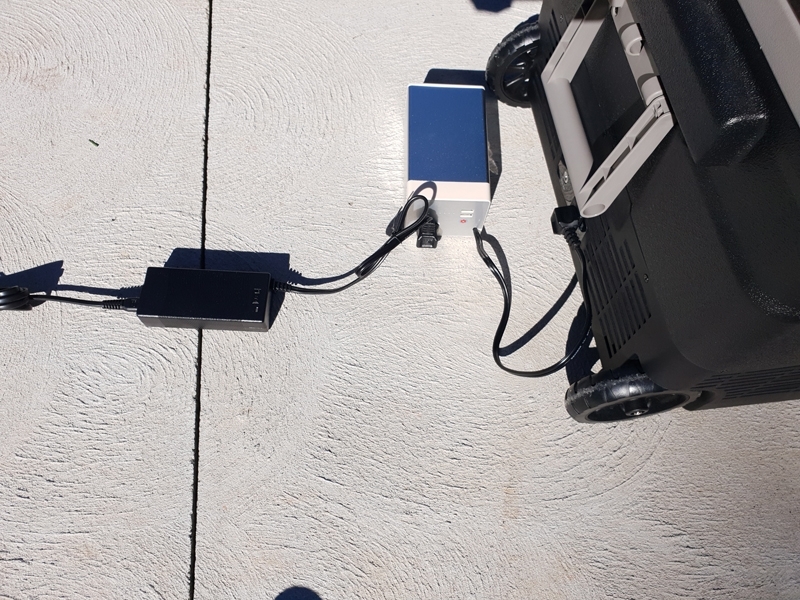
There is one last option for a battery powered camping or portable fridge, and it suits any fridge in the Brass Monkey range. This is a 15.6Ah encased battery (GH2084), not with terminals like the others, but its own case and power lead terminated in a plug just like the car and mains leads that come with the fridge. In other words, it plugs in where the normal power cords plug in! This means you can use it with any fridge in the range, not just those designed for battery operation.
The best thing is, it charges from the normal fridge power supply! Therefore, you do not need a special charger. If you are not using your fridge, plug its power supply, either mains or car, into the socket on the end of the battery, just like you would on the fridge. The battery has a row of LEDs on it to show charge state.
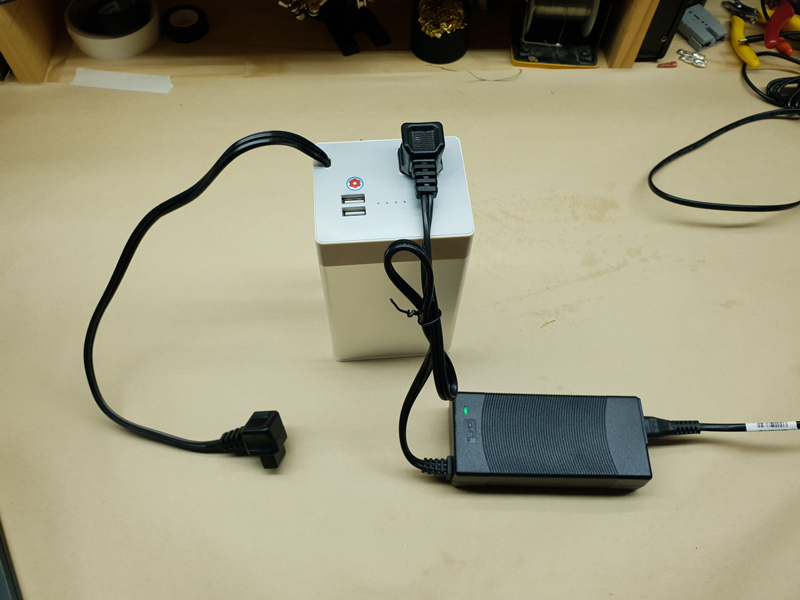
If you are using the fridge, the battery can be plugged in line, with the power supply to the battery, and the battery to the fridge. This way, the battery charges constantly but feeds the compressor when needed.
If you own a Dewalt, Makita or Milwaukee cordless power tool, you can use its battery to power the GH2028 Brass Monkey fridge freezer with dual battery compartments. Clip the suitable adaptor into the standard battery cradle and onto your power tool’s battery.
GH2063 Fridge Battery Cradle to suit Milwaukee
GH2064 Fridge Battery Cradle to suit MakitaGH2065 Fridge Battery Cradle to suit Dewalt
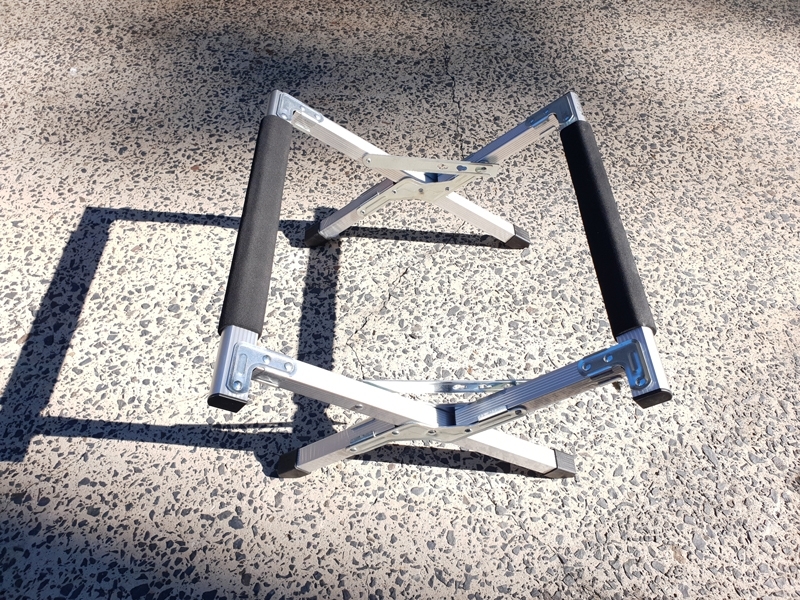
Another portable fridge accessory you may wish to consider to help make your fridge more usable is a folding stand (GH1608). This is a 'one size fits most' approach, a folding stand which is compact to store (and can even be stored inside many of the larger sizes of fridge) but folds out to hold all but the very largest fridges. It comes with its own storage bag.
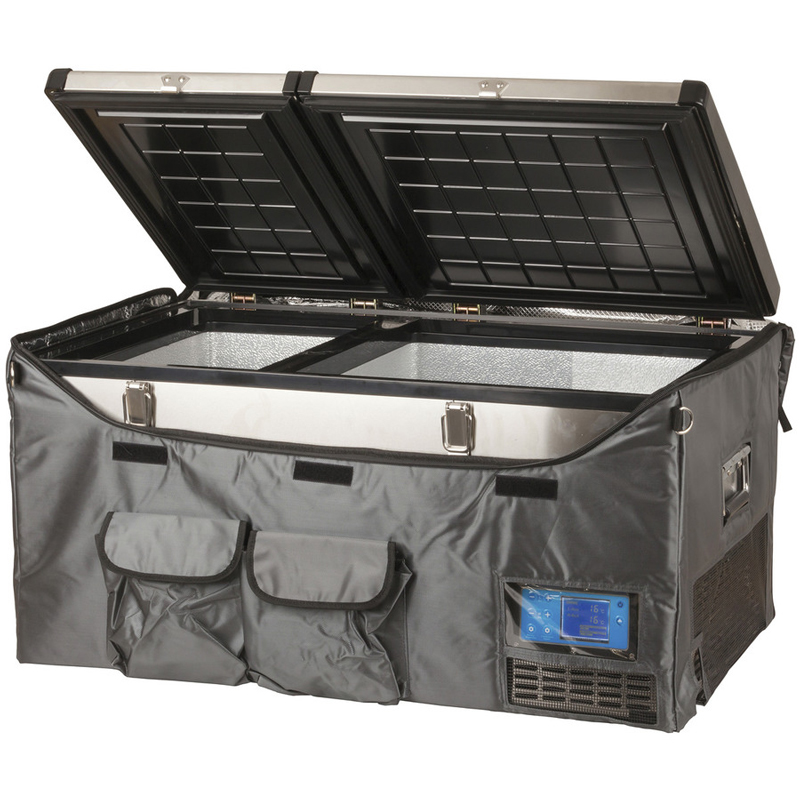
The other item worth having is a fridge cover. These are a layer of nylon or canvas fabric on the outside, thermal insulation in the middle, and foiled plastic reflective liner on the inside. They serve to keep heat out and make the fridge more efficient, reducing the load on your batteries or power setup. They are available for many of the fridges in the range, and those that do not have one, usually fit one intended for a similar fridge.
Similar projects you may be interested in